Aruba 2930F base, Device-Profile and VSF configuration
Hello there.
This is technically a continuation of the "Aruba 8360 Basic and VSX configuration" post, which is part of a larger project. But I will separate it since this is different hardware.
Most of this will be similar to the Aruba 3860 configuration. The main differences will be the VSF Stack configuration and device profiles. The latter is for the Aruba APs we will deploy at a later date. This allows us to automatically configure Aruba AP ports on the switch with predefined settings like VLANs for example.
As usual, I am using Fedora KDE Plasma for the configuration.
Let us begin.
First steps
I will connect over a serial connection to the switch. The steps are identical to the ones on the Aruba 8360 guide.
Connect the device with your preferred application. I will use "screen".
fedora-kde :: ~ » sudo screen /dev/ttyUSB3 115200
Unlike the ArubaOS-CX systems, you have to set a password. I use "admin".
switch login: admin Password: Please configure the 'admin' user account password. Enter new password: ***** Confirm new password: *****
Change the hostname.
Aruba-2930F-48G-PoEP-4SFPP# configAruba-2930F-48G-PoEP-4SFPP(config)# hostname switchswitch(config)#
Aruba 2930F basic configuration
Ok, now we can go through the basic configuration. We will create VLANs, set MSTP, IPs and a default gateway. After this is done, we will create a device profile, the VSF stack and define our Trunks/LAGs.
Let's continue, beginning with the VLAN creation, naming and setting an IP address.
VLAN creation
// Creating the vlans
switch(config)#vlan 10,20,30,40,50,60,70// Switching into the "vlan 10" context
switch(config)#vlan 10
switch(vlan-10)#name SERVER
switch(vlan-10)#vlan 20
switch(vlan-20)#name CLIENT...
switch(vlan-70)#// Set a IP address
switch(vlan-70)#vlan 30
switch(vlan-30)#name MGMT
switch(vlan-30)#ip address 10.155.20.110/24
switch(vlan-30)#exit
switch(config)#Default Gateway
Great. Now we will set a gateway.
// Setting the default gateway
switch(config)# ip route 0.0.0.0/0 10.255.20.254Spanning-Tree
Next, we will configure STP. I already defined an MSTP Region on the Aruba 8360 switches, so this will be identical.
// Enable STP
switch(config)# spanning-tree// Set the Region name
switch(config)# spanning-tree config-name STP// Set the Revision
switch(config)# spanning-tree config-revision 1Aruba 2930F Device Profiles
As I mentioned earlier, device-profiles allow us to auto-configure ports for specific devices (Aruba APs in our case). Once the switch discovers the defined device on a port via the lldp signature, it sets the template configuration for said port.
The "aruba-ap" type is predefined. So you can just use that if you are using Aruba Access Points. But what if you want to create a template for devices from different manufacturers? Well, there is a way to create custom device types with the "device-identity" option. This requires lldp support.
I don't have a device right now to test this feature, but I will create a test configuration once I prepared a raspberry pi to test it out. There will be another post for this at some point.
Anyway. Let us continue with the configuration.
// Create a new profile and switch into it
switch(config)# device-profile name "Aruba-AP"// Set the template
switch(device-profile)# untagged-vlan 50switch(device-profile)# tagged-vlan 60,70switch(device-profile)# exit// Switch into the device-profile type context
switch(config)# device-profile type aruba-ap// Associate the type to the template/profile
switch(device-aruba-ap)# associate "Aruba-AP"// Enable Profile
switch(device-aruba-ap)# enableswitch(device-aruba-ap)# exitswitch(config)#Here is an easier to read output.
switch(config)# show running-config... device-profile name "Aruba-AP" untagged-vlan 50 tagged-vlan 60,70 exit device-profile type "aruba-ap" associate "Aruba-AP" enable exit ...
A few show commands
switch(config)# show device-profile config Device Profile Configuration ... Configuration for device-profile : Aruba-AP untagged-vlan : 50 tagged-vlan : 60,70 ingress-bandwidth : 100% egress-bandwidth : 100% cos : None speed-duplex : auto poe-max-power : Class/LLDP poe-priority : critical allow-jumbo-frames : Disabled allow-tunneled-node: Enabled profile-mode : port-mode ...switch(config)# show device-profile status Device Profile Status Port Device-type Applied device profile ------------- -------------------- ---------------------- 3 aruba-ap Aruba-AP 30 aruba-ap Aruba-AP
Aruba 2930F VSF configuration
Ok. Now, we have around 3-5 switches per stack in this project. So before I create the trunks, I want to first configure the VSF stack. This allows me to create trunks spanning several switches.
The VSF configuration is quite easy actually. There are multiple methods to create a stack. I will use the automatic one. But you could also configure every switch manually. You basically do the same configuration on every switch.
Let's configure the primary switch.
// Switch into the vsf context
switch(config)# vsf// Define the port you want to use for the stack (52 is the port number)
switch(vsf)# member 1 link 1 52All configuration on this port has been removed and port is placed in VSF mode.
switch(vsf)# member 1 link 2 51All configuration on this port has been removed and port is placed in VSF mode. // Enable VSF
switch(vsf)# enable domain 1This will save the current configuration and reboot the switch. Continue (y/n)? y
Connect to the switch again, once it's up and reachable.
You will notice that the numbering for the interfaces has changed. It will have a "1" before the port number like this. "1/22". This tells you which member in the stack it is. The second switch in the stack will have a "2" the third a "3" and so on.
Adding the second switch.
Now, this step is important. Do not power on the second switch before you connect it correctly to the primary. If you do, you will have to join it to the stack manually (which isn't difficult, but still) or you have to reset the device to factory defaults.
Connect the port you want to use for your ISL/Stack to one of the ports we defined earlier and power on the switch.
The device will reboot once, after this it should show up in the VSF configuration.
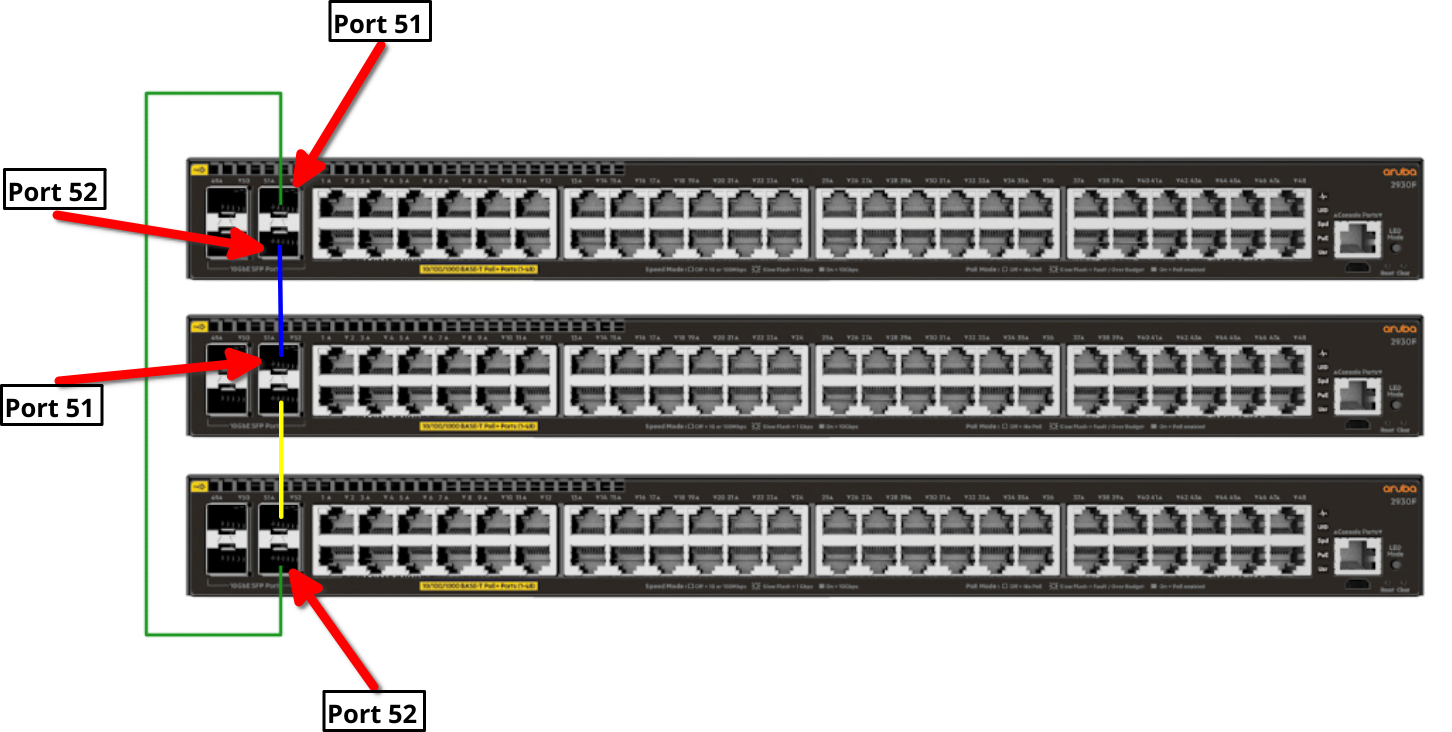
I like to connect port 52 from the primary switch to port 51 of the second switch (see picture below) if I have more than 2 switches. Just repeat this down the line and connect the last port of the last switch (Port 52) to port 51 on the first stack switch.
Once the second switch is in the stack, we have to configure the second link.
switch(config)# vsfswitch(vsf)# member 2 link 2 2/52All configuration on this port has been removed and port is placed in VSF mode.
Repeat this for every switch you want to add.
Compact command list
Here are the same commands without the fluff.
switch# configswitch(config)# vsfswitch(vsf)# member 1 link 1 51switch(vsf)# member 1 link 2 52switch(vsf)# enable domain 1// Switch reboots // After the reboot, attach the second switch to one of the ports and power it on switch(vsf)# member 2 link 2 2/52// Attach the third switch to this port switch(vsf)# member 3 link 2 3/52// Either attach a fourth switch or connect this port to port 51 on the first switch.
LAG / Trunk configuration
Now that we have our stack, we can configure the LAGs/trunks.
We need one LAG to connect to the aggregation switch. For this, I will use 2 of the SFP+ ports. One from the first and one from the third switch.
These are access switches, so we probably won't need more than one trunk.
// Create the LAG using ports 1/50 and 3/50
switch(config)# trunk 1/50,3/50 trk1 lacp// Configure trk1 interface
switch(config)# interface trk1switch(eth-Trk1)# tagged vlan10,20,30,40,50,60,70 // Name interfaces
switch(eth-Trk1)# interface 1/50,3/50switch(eth-1/50,3/50)# name "UPLINK-AGG"switch(eth-1/50,3/50)# exit// Show trunk
switch(config)# show trunksLoad Balancing Method: L3-based (default) Port | Name Type | Group Type ------ + -------------------------------- ---------- + ----- -------- 1/50 | UPLINK-AGG | Trk1 LACP 3/50 | UPLINK-AGG | Trk1 LACP
That's it. I will deploy these devices within the next couple of weeks. So if something noteworthy shows up, I will update this post or create a new one if there is too much.
Below is the "running-config" of the actual stack with a few tweaks, since this is still a customer system. It is not completely identical to the above guide, since I did change a few things to make it more readable. But the main configuration is in there.
[bg_collapse view="link" expand_text="Show More" collapse_text="Show Less"]
hostname "switch"
vsf
   enable domain 1
   member 1
      type "JL255A" mac-address ec0273-340000
      priority 128
      link 1 1/51
      link 1 name "I-Link1_1"
      link 2 1/52
      link 2 name "I-Link1_2"
      exit
   member 2
      type "JL255A" mac-address ec0273-340001
      priority 128
      link 1 2/51
      link 1 name "I-Link2_1"
      link 2 2/52
      link 2 name "I-Link2_2"
      exit
   member 3
      type "JL255A" mac-address ec0273-340002
      priority 128
      link 1 3/51
      link 1 name "I-Link3_1"
      link 2 3/52
      link 2 name "I-Link3_2"
      exit
   port-speed 10g
   exit
trunk 1/50,3/50 trk1 lacp
interface 1/50
   name "UPLINK-AGG"
   exit
interface 3/50
   name "UPLINK-AGG"
   exit
snmp-server community "public"
vlan 1
   name "CLIENT"
   untagged 1/1-1/50,2/1-2/50,3/1-3/50,Trk1
   no ip address
   exit
vlan 10
   name "SERVER"
   tagged Trk1
   no ip address
   exit
vlan 20
   tagged Trk1
   no ip address
   exit
vlan 30
   tagged Trk1
   ip address 10.155.20.110 255.255.255.0
   exit
vlan 40
   tagged Trk1
   no ip address
   exit
vlan 50
   tagged Trk1
   no ip address
   exit
vlan 60
   tagged Trk1
   no ip address
   exit
vlan 70
   name "VOIP"
   tagged Trk1
   no ip address
   voice
   exit
spanning-tree
spanning-tree Trk1 priority 8
spanning-tree config-name "STP"
spanning-tree config-revision 1
device-profile name "ARUBA-AP"
   untagged-vlan 50
   tagged-vlan 60,70
   exit
device-profile type "aruba-ap"
   associate "ARUBA-AP"
   enable
   exit
[/bg_collapse]